Hello Crafty Friends,
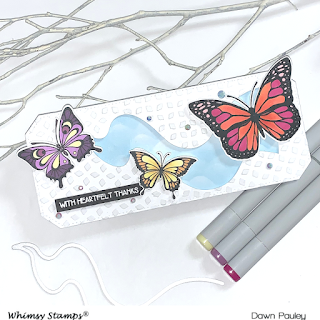
I’m over on the Whimsy Stamps Blog today sharing how I made this slimline card with a DIY stencil and texture paste. I used the Whimsy Stamps Butterflies Stamps set and matching die along with the Revelers 1 die set and some other products!

So let’s get started!
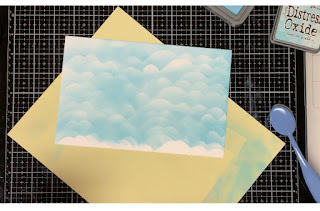
First, I make a cloud background with some distress oxide ink. You can use the Whimsy Stamps Grass and Cloud Edger die set or you can create your own cloud stencil by cutting different size humps in a piece of card stock.
Then, I cut a rectangle from a piece of white card stock using the largest Whimsy Stamps Slimline Cornered Rectangle Die. Then, I took the Reveler Die and cut it in the center of the rectangle and using a craft knife I cut off the straight edge.
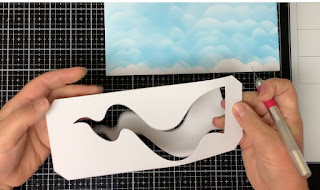
Next, I used the same rectangle to cut out the clouds. At this point is when you should put your distress texture paste on with your stencil. It makes it much easier that way. However, when I made this card, I didn’t decide to use the distress texture paste until after I put the card together. So, the next picture shows me putting it on after the card is some what assembled. To make my stencil, I used the Whimsy Stamps A2 Lattice Die and die cut it from a piece of white card stock. I used this as my stencil.

Once I cover the whole paper with my paste, I let it dry for a little while. Then, I take some foam tape and put it on the back of the white background and adhere it over the cloud paper.
I colored in all of my butterflies with copic markers.
I used the following colors:
Small Butterfly – Y13, YR00
Medium Butterfly – Y13, V04, V09, RV66
Large Butterfly – YR07, RV09, RV63
I heat embossed the sentiment “With Heartfelt Thanks” with white embossing powder onto a piece of black card stock. Then, I put foam tape on the back of it and adhered it to the card.I put foam tape on the back of the butterflies and adhered them to the card. To finish off the card, I scattered some gems randomly onto the card.
That completes my card for today!
I have attached a list of the products I used to create this card if you are interested.
Affiliate Links may be used at absolutely NO Charge to you. All items have been personally purchased by me except for the Whimsy Stamp products which are supplied for being on their Design Team. I do not work for any of these companies. Whether gifted or products I bought, I only recommend products I personally use and like. All opinions are my own. Proceeds I make off of the affiliates helps me to offset some of the cost to maintain my blog, Youtube channel and supplies needed to bring you new content.

Copyright: I am happy to share my creations with you. I don’t mind if you use them for your own personal use. If you decide to share what you’ve made online, please link back to my Youtube Channel or Social Media post that inspired your design. While I love this and encourage it. It is NOT ok for someone to sell anything that was created by my design or to use my photos for any type of compensation. I appreciate your understanding in this.
D Pauley Designs is a participant in the Amazon Services LLC Associates Program, an affiliate advertising program. I may earn small commission off of your purchase.