Hello Crafty Friends!
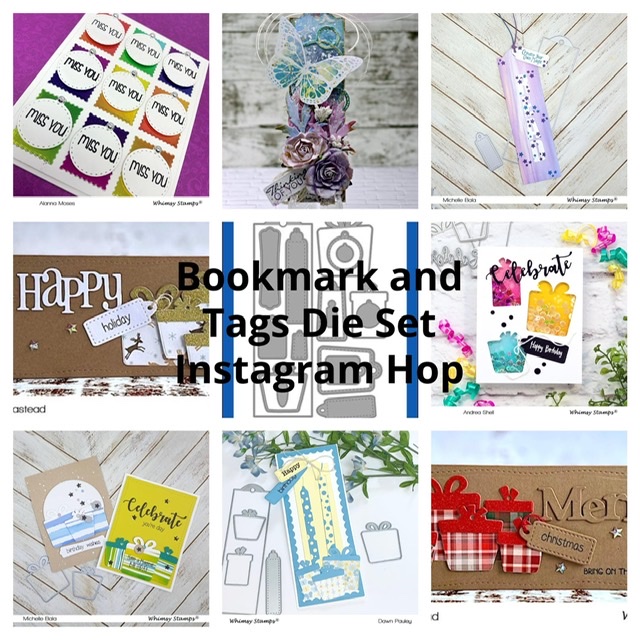
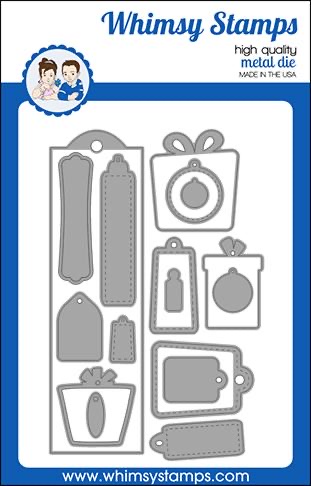
Some of the Whimsy Stamps Creative Team are hopping along today bringing you inspiration using the amazing Bookmark and Tags die set. This die collection has 17 dies and is perfect to create bookmarks and tags of all shapes and sizes.
One lucky person who comments will win a $25 gift certificate to Whimsy Stamps. Be sure to visit each stop on the hop. The more stops you visit, the better your chances of winning! Today, I made two different cards for you. On the first card I used the Bookmark and Tags die set, the Slimline Birthday Scallops die and the Slimline Pocket Die.
Your next stop on the hop is @wizardessofcards
Before you go, be sure to
1. Like this post,
2. Follow me, and
3. Leave a comment (Tag as many friends as you would like – in separate comments – for additional entries).
This giveaway closes at midnight EST on Thursday, April 22nd, and is in no way sponsored or endorsed by Instagram, Facebook, or any other entity except Whimsy Stamps. The winner will be randomly selected and posted on the Whimsy Stamps Instagram account on Friday, April 20th.
Here is a full list of the hop participants.
@westie1702 @iriswiechmann @tanglemousecards @embellish.craft.love @michelle.bala @wizardessofcards and of course me @dpauleydesigns
For my first card, I used the Whimsy Stamps Bookmark and Tag Die Set, the Slimline Birthday Scallop Die and the Slimline Pocket Die.
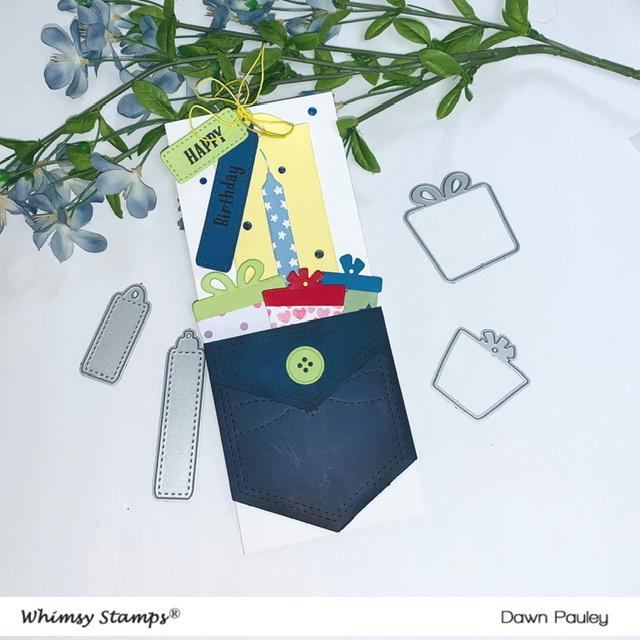
First, I die cut the Bookmark from Yellow card stock, the Tags from Blue and Green card stock and the Presents from pattern paper I had. For the tops of the presents, I die cut the same presents from solid card stock. I used Green, Red and Blue card stock. I cut off the tops of the presents and adhered them to the pattern paper presents as shone in the picture.
Next, I cut the Slimline Pocket die from Blue card stock. I then used the decorative die to decorate the pocket. I took some black ink and blended around the edge of the pocket and the flap of the pocket. I adhered the flap to the pocket and die cut a green button and attached it to the pocket.
I cut a piece of white card stock to 8 1/2″ x 7″ and scored it at 3 1/2″. I attached the pocket to the white card stock . Then I glued the presents inside the pocket.
I cut a candle from Slimline Birthday Scallop die from the Baby Bear Pattern Paper. I glued it to the bookmark. Then, I stamped the Sentiment “Happy” on one green tag and “Birthday” on the blue tag. I tied them to the card with some twine.
To finish off the card, I put gems randomly on the card.
I have attached a list of the products I used to create this card if you are interested.
Affiliate Links may be used at absolutely NO Charge to you. All items have been personally purchased by me except for the Whimsy Stamp products which are supplied for being on their Design Team. I do not work for any of these companies. Whether gifted or products I bought, I only recommend products I personally use and like. All opinions are my own. Proceeds I make off of the affiliates helps me to offset some of the cost to maintain my blog, Youtube channel and supplies needed to bring you new content.

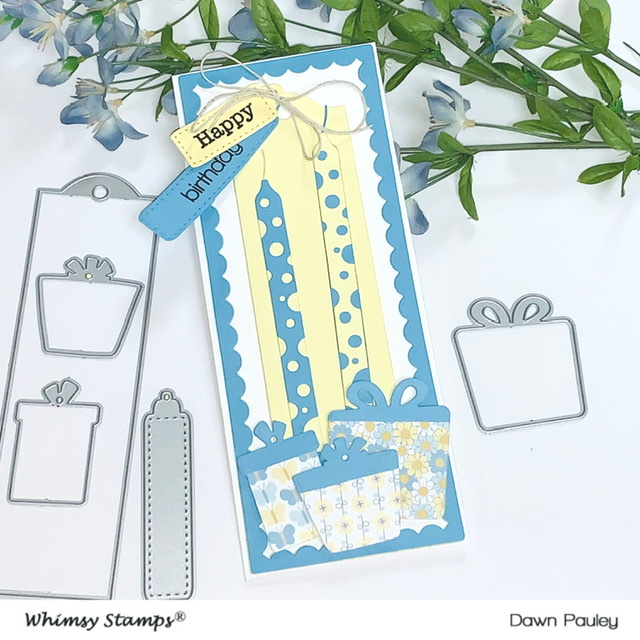
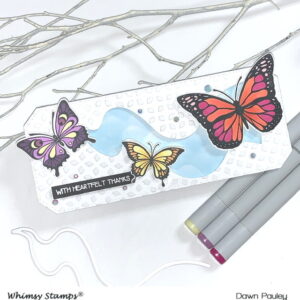
For my second card, I used the Whimsy Stamps Bookmark and Tag Die set, the Slimline Birthday Scallop Die and the Slimline Buttercup Paper Pack.
First, I die cut the the candles from Yellow and Blue card stock and glued one of the yellow pieces on top of the blue one and one of the blue ones on top of the yellow ones. I die cut the bookmark from Yellow card stock and the scalloped border from Blue card stock.
I cut one of the tags from yellow card stock and the bigger tag from blue card stock and then stamped the sentiment “Happy” onto the yellow tag and the sentiment Birthday onto the Blue tag.
Next, I die cut three of the presents out from the Slimline Buttercup pattern paper. Then I cut three of the same presents out with blue card stock. Then, I cut the tops off of the blue presents and adhered them to the top of each of the presents.
I glue the blue scalloped edge to a piece of white card stock cut to 8 1/2″ x 7″ and scored at 3 1/2″ . Then I put craft foam on the back of the book mark and adhere it in the middle of the scalloped edge paper.
I glue the candles onto the bookmark and then put foam tape on the back of all the presents and glue them to the front of the card. I take some twine and tie the tags onto the bookmark.
That completes my second card. I hope you join us on Instagram to see all the great creations from the other designers.
Don’t Forget:
This giveaway closes at midnight EST on Thursday, April 22nd, and is in no way sponsored or endorsed by Instagram, Facebook, or any other entity except Whimsy Stamps. The winner will be randomly selected and posted on the Whimsy Stamps Instagram account on Friday, April 20th.
I have attached a list of the products I used to create this card if you are interested.
Affiliate Links may be used at absolutely NO Charge to you. All items have been personally purchased by me except for the Whimsy Stamp products which are supplied for being on their Design Team. I do not work for any of these companies. Whether gifted or products I bought, I only recommend products I personally use and like. All opinions are my own. Proceeds I make off of the affiliates helps me to offset some of the cost to maintain my blog, Youtube channel and supplies needed to bring you new content.

Copyright: I am happy to share my creations with you. I don’t mind if you use them for your own personal use. If you decide to share what you’ve made online, please link back to my Youtube Channel or Social Media post that inspired your design. While I love this and encourage it. It is NOT ok for someone to sell anything that was created by my design or to use my photos for any type of compensation. I appreciate your understanding in this.
D Pauley Designs is a participant in the Amazon Services LLC Associates Program, an affiliate advertising program. I may earn small commission off of your purchase.