Hi Everyone and welcome back. Today I’m excited to share my 5th Altenew Academy Class with you. I thought I would be further along in my classes by now but it’s taking me a little longer to go through the classes because I’m making video tutorials of all my cards. The good news is I should be able to move along a little faster with my classes now that my kids are heading back to school. The bad news is I’m not sure how feel about my kids going back to school. They’ve been home with me for so long with this pandemic it’s going to feel so weird with them going back to school. So I’ll be keeping my self busy making cards and taking these classes 🙂
Today’s class is called For the Guys. It was taught by the amazing Jennifer Rzasa. She had such great ideas for cards for guys. I just loved how she also involved her husband in one of her cards. Sometimes it can be challenging making a card for a guy. This card is definitely out of my comfort zone of my usual floral cards but I was pleased with how it turned out and I had a lot of fun making it. The card I made was inspired by one of Jennifer’s cards. I just fell in love with the Altenew Congrats! Stamp set. (p.s. This stamp set is on sale for $6.00) 🙂 So I decided to make my nephew a Graduation card. I know it’s not your traditional grad card but I thought it reflected his personality.
So let’s get started!
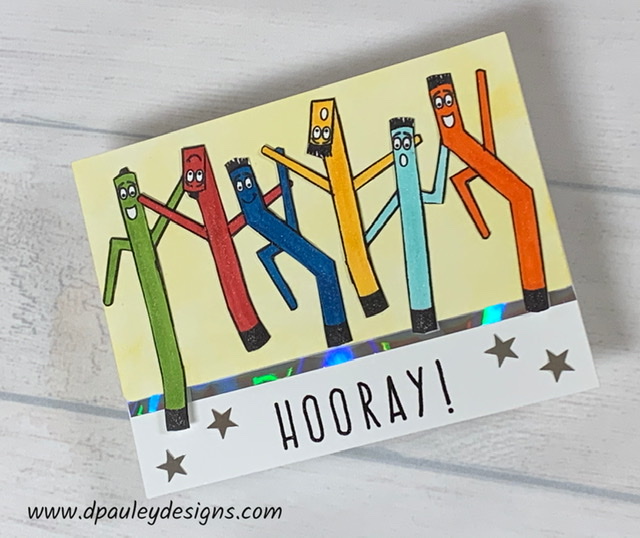
Today I am using the Altenew Congrats! Stamp set. It has these really cute stick figures. It comes with different sets of hair, a set of eyes and different mouths. You can make the arms go up or down. It’s a really cute stamp set.
Using my Misti Stamping tool, I place the body shapes onto a piece of Neenah classic Crest 110 lb cardstock. Then I stamp them using the Altenew Jet Black Ink. I stamped two sets of them because I wanted the card to look like a dance party on the front of the card.
I wanted to have some with their arms going up and some so it looks like they’re dancing and waving. (I like to use the misti stamping tool when I have to stamp multiple images. I can leave the arms where they are and just put in the next set of these little guys and keep stamping.)
I decided to use an acrylic block to stamp the face, hair and base . I think it’s easier than using my misti since the stamps are so small.
When I stamped the base of the body I made some shorter and some taller depending on where I put the base. I didn’t want them all the same height. I just cut off any excess of the body that I didn’t need.
The stamp set only comes with one set of eyes so they all have the same eyes but they have really cute mouth expressions. Some have an open mouth, some I gave a simple smile too and some have a big open mouth smile. I just think it adds character to the figures with the different face expressions.
I colored in all figures using the Altenew Artist Markers set A and 2 of my copic markers.
These are the colors I used.
Altenew B227 – Desert night, Altenew B201- Sea Glass, Altenew G715 – Forest Glades, Altenew R318 Ruby Red. Copic markers – Cadmium Orange YR07 and Copic Marker – Golden Yellow-Y17
Then I fussy cut the figures out. They’re pretty simple to cut around. I used my Fiskar Scissors. They have a spring mechanism that makes it easier on your hand when doing a lot of cutting.
I used the Altenew black artist marker to color all around the edges of all the figures. This gives them a more finished look. It blends in with the black outline of the stamp of the body so you can’t tell you colored the sides.
Now I will put my ink blending skills to work that I learned in the last class I took.
I used a piece of Neenah Classic Crest 110lb Cardstock cut to 3″ x 5 1/2″ and my Altenew Sunray ink to make a blended background to put the figures on. I start by rubbing the ink onto the Tim Holtz glass media mat. This helps to prevent harsh dark spots from forming on the paper. I use a Blending brush rather than a blending tool. I like how it comes out better. I wanted it to look a little splotchy. I wasn’t going for a solid look and I think it gives it a softer look as well.
I cut a ¼ strip of this really cool Holographic paper I got at Simon Says Stamp.
Ok, It’s time to assemble the card. First, I adhere a piece of Craft Foam to the back of the blended panel that I cut to a little less than 3 x 5 ½ inches. Then I adhere the blended panel onto the front of a piece of white neenah classic crest 110lb cardstock folded to 5 ½” x 4 ¼” . I glue the Holographic strip along the edge of the blended panel. I think it adds a little bit of sparkle to the card.
I heat embossed the “Hooray” sentiment onto the card. First I rubbed the Embossing Powder Bag onto the card so the embossing powder only goes where you want it to. Then I stamped it with the Altenew Obsidian black ink.
I used the Ranger Clear Embossing Powder to cover the sentiment. When my Heat Tool is good and hot, I emboss the sentiment making sure to keep moving all around and not stay in one spot.
Yeah almost done! This is my favorite part. I arrange the little guys onto the card to make them look like they’re all dancing and their arms interlocking and just having fun. Once I have them where I want them to go. I glue them onto the card using my Art Glitter Glue.
I always like to add some kind of sparkle to my cards. I had silver star embellishments that I thought would be great for this card. (If you don’t have star embellishments you can make your own little stars if you have a small star die. ) I just happened to have these so I thought I would use them. I used my Jewel Picker to help me pick them up so I could adhere them to the card. It makes it much easier to pick up small objects.
I decided to give it a little more sparkle since it is such a fun card. I added some clear Wink of Stella to all of the little guys so they could sparkle. It’s a little hard to see the sparkle in the picture but it really does add a lot of shine!
That completes my card for today. If you would like to see how I made the card, please watch my Youtube Video listed below.
I have attached a list of the products I used to create this card if you are interested.
Affiliate Links may be used at absolutely NO Charge to you. All items have been personally purchased by me. I do not work for any of these companies. I only recommend products I personally use and like. All opinions are my own. Proceeds I make off of the affiliates helps me to offset some of the cost to maintain my blog, Youtube channel and supplies needed to bring you new content.
Copyright: I am happy to share my creations with you. I don’t mind if you use them for your own personal use. If you decide to share what you’ve made online please link back to my Youtube Channel or Social Media post that inspired your design. While I love this and encourage it. It is NOT ok for someone to sell anything that was created by my design or to use my photos for any type of compensation. I appreciate your understanding in this.

So creative and eyecatching!
You did such a fantastic job with the card and the video! I am sure the recipient loved it!
Thank you for entering your work to the AECP assignment gallery.