Welcome Everyone,
Today’s card is a simple embossed poinsettia card for the Papercraft Business December Challenge. This Challenge is “Anything Goes”. I chose to make a Christmas card for this challenge.
So why not head on over to the Papercraft Business Challenge and join in on the fun!
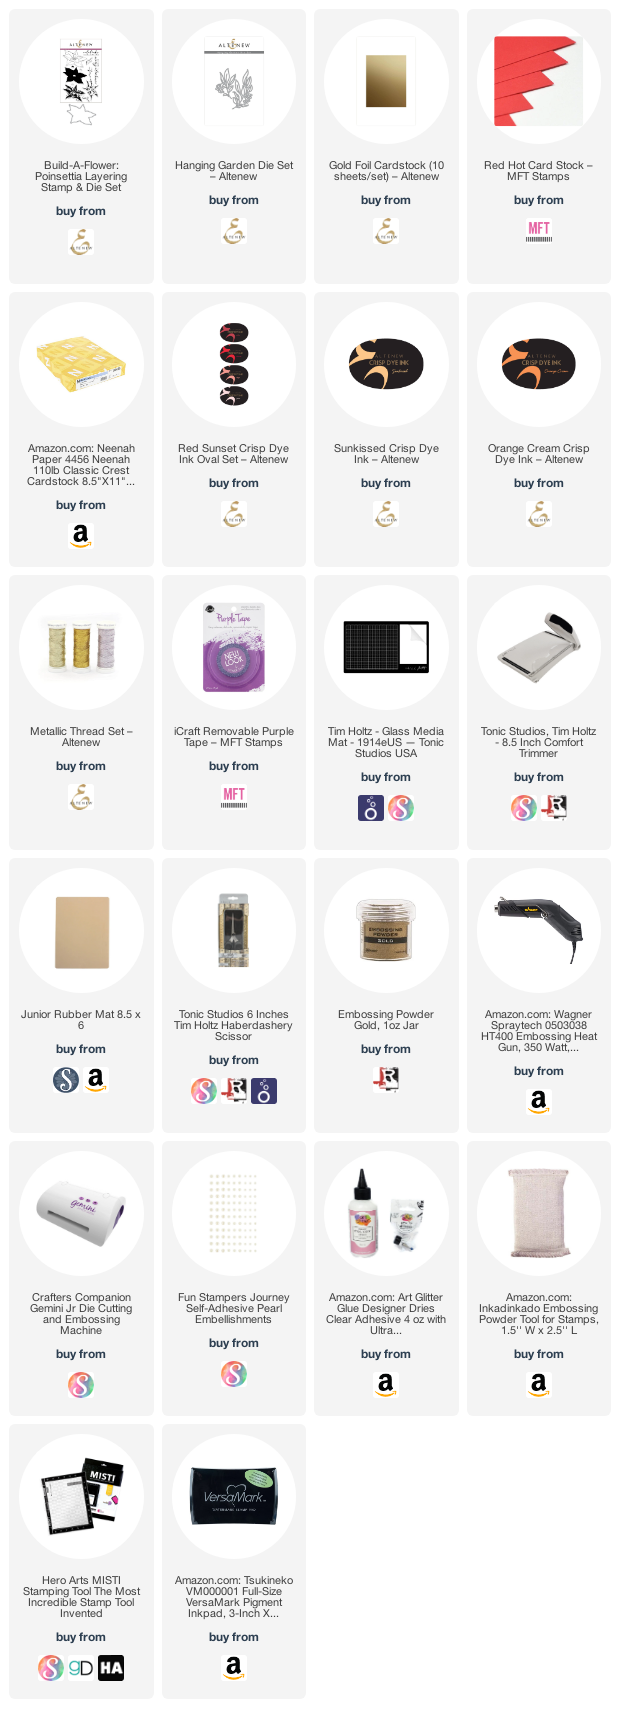
Today, I will be using the Altenew BAF Poinsettia Stamp and Die Set and the Altenew Hanging Foliage die set.
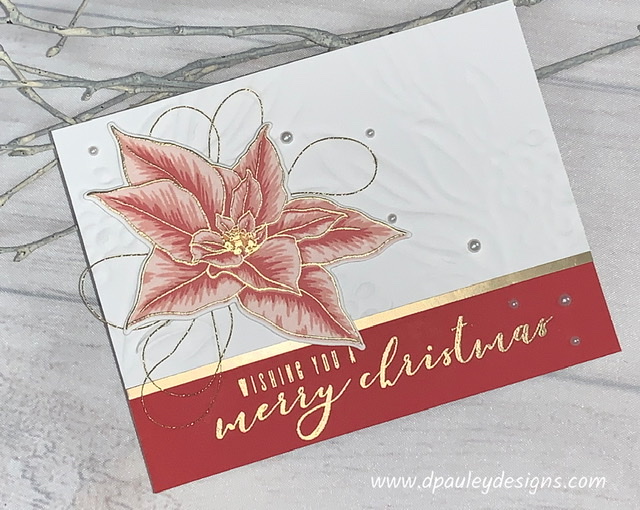
First, using my Gemini Jr, I die cut 3 each of the hanging foliage dies. I do 2 sets of the large foliage and 1 set of the small foliage. Using my Art Glitter Glue, I glue 3 of the large foliage dies together and set it aside. I glue the next 3 large foliage dies together and set it aside. I glue the 3 small foliage dies together. These will be used to make impressions in my card stock.
Next, I take a piece of Neenah Classic Crest 110lb card stock cut to 5 1/2″ x 4 1/4″ and I place the glued die cuts where I want them laid out on my card stock to make a design for the background of my card. Then I use the Embossing pad from spellbinder and place it on the clear die cutting plate of the Gemini jr. I place my card stock with my foliage die cuts on it on the spellbinder embossing mat and then place another clear die cutting plate over it and run it through the Gemini Jr.
When done, the card stock should have the die impressions of the foliage on it. I then trim this panel down to 5 1/4″ x 3″. I glue this panel onto a piece of My Favorite Things Red Hot card stock. I trim a piece of Gold Foil card stock that is about 1/8″ x 5 1/2″ and glue it under the white panel (see picture for placement)
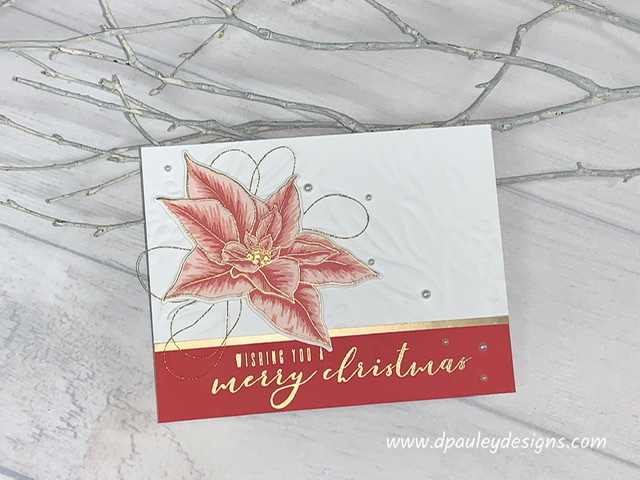
Now, I stamp my poinsettia using my Misti Stamping Tool. The Misti helps me when I have to do layered stamping. First, I prep my paper with my Embossing Powder Bag. Then, I stamp the outline image using Versamark ink. Next, I pour Ranger Gold Embossing Powder onto the card stock. When my Heat Tool is good and hot. I heat emboss my image.
Now I take the most solid image of the poinsettia and stamp it on to the embossed out line image using the Altenew Blush ink. Make sure to press down really good to give it a nice impression. Then I stamp the second layer of the poinsettia with the Altenew Rouge Ink and the last layer with the Altenew Crimson Ink.
I then stamp the solid image of the center of the flower with the Altenew Sunkissed Ink. I stamp the second image of the center of the flower with the Altenew Orange Cream Ink. For the final layer of the center of the flower, I chose to heat emboss it with Ranger Gold embossing powder. (follow the steps above to heat emboss again)
Next, I die cut the poinsettia out using the Altenew Poinsettia die. Then I set it aside for later.
I put the hanging floral panel into my Misti Stamping tool so I can stamp the sentiment onto the bottom of the panel. I prep my paper with the embossing powder bag and then stamp the sentiment “Wishing you a Merry Christmas” from the Altenew BAF Poinsettia stamp set with Versamark Ink. Then I cover the sentiment with Ranger Gold embossing powder and when my heat tool is good and hot I heat emboss the sentiment.
I take some of the Altenew Enchanted Gold thread and make 3 figure 8’s and glue it onto the left side of the card. Then I glue the Poinsettia on top of the gold thread.
I take some Fun Stampers self adhesive Pearls and randomly place them on the card. I take the entire front panel and glue it onto a piece of Neenah Classic Crest 110lb cardstock.
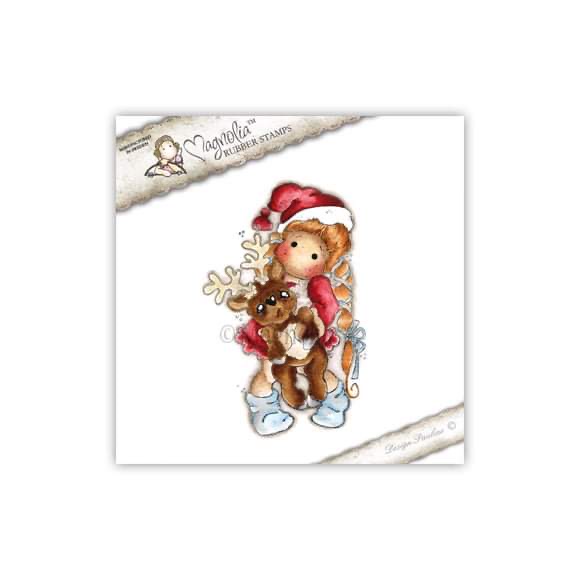
That completes my card for today. Come join in on the fun at the PaperCraft Business Challenge. You could win this great stamp set. Magnolia Designs – Tilda with Little Rudolf
I have attached a list of the products I used to create this card if you are interested.
Affiliate Links may be used at absolutely NO Charge to you. All items have been personally purchased by me. I do not work for any of these companies. I only recommend products I personally use and like. All opinions are my own. Proceeds I make off of the affiliates helps me to offset some of the cost to maintain my blog, Youtube channel and supplies needed to bring you new content.
Copyright: I am happy to share my creations with you. I don’t mind if you use them for your own personal use. If you decide to share what you’ve made online please link back to my Youtube Channel or Social Media post that inspired your design. While I love this and encourage it. It is NOT ok for someone to sell anything that was created by my design or to use my photos for any type of compensation. I appreciate your understanding in this.
D Pauley Designs is a participant in the Amazon Services LLC Associates Program, an affiliate advertising program. I may earn small commission off of your purchase.